My Wonderful World

Welcome and Enjoy!

Sunday, August 29, 2010

Grilled Brats!!

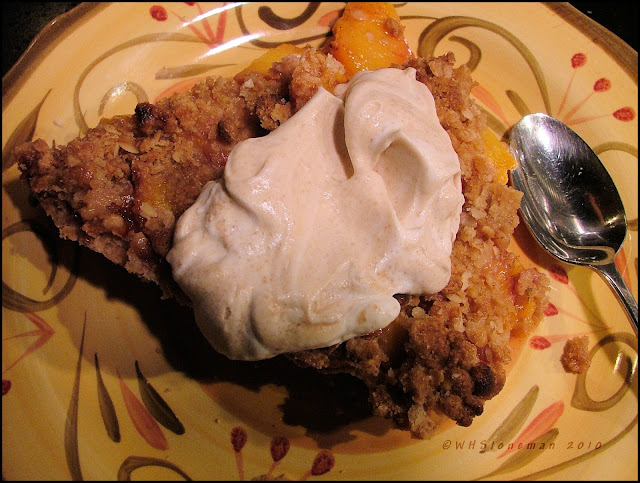
No recipes today...you don't need them!!   Johnsonville Grilled Brats on the Wolf Grill  (I love that thing)   ...tossed salad, sweet tater fries and for dessert, Peach Pie with whipped cream.    And I add a little almond extract instead of vanilla to the whipped cream sweetened with a couple of sprinkles of Splenda.  Wishing your summer evening  meal a smashing success. 


Our great friends from Buffalo, NY sent us this little treat!! 

An Outstanding Mustard!!
Brats...Sweet Tater Fries and Salad
 
And who couldn't resist Peach Pie for dessert??  


Buttermilk Chicken ala Ellen Brennen


Howdy friends and foodies!!   A week or so ago, there was discussion about buttermilk and the number of people that do not buy buttermilk or have any in the refrigerator.   Living in the South, I find that odd...but then again, being born and raised a Yankee Michigander, we NEVER had buttermilk and I didn't even know what it was.  
After moving to the South over thirty years now, I don't know of a single neighbor or friend that doesn't have buttermilk in their refrigerator!  I make so many things with buttermilk, i.e. pancakes, baked goods, coffee cakes, salad dressings, Southern Fried Chicken, cucumbers and onions..the list is quite long.   And buttermilk never "blinks" since it is a soured milk product to begin with...and the flavor is remarkably similar to sour cream.    I must add the Yankee misconception is to add a teaspoon of vinegar to sweet milk and that can be substituted...WRONG...you just made sour milk...NOT buttermilk.  
There are some very good versions of Low Fat Buttermilk here in East Tennessee and my preferred brand is from the Mayfield Dairy in Athens, Tennessee.  Watching calories, etc. much of my cooking/baking is following the Sugar Busters lifestyle.   Since starting their program, I have lost 42 pounds and still have 30 more to go...and it has become easy to loose a pound and a half per week...when following the rules.  Sometimes, we "fall off the calorie wagon" but have to get right back on!

I found this recipe from Ellen Brennen...she co founded Brennen's Restaurant in New Orleans.  Check out Amazon to find her cookbooks.   
  

@@@@@ Now You're Cooking! Export Format

Buttermilk Chicken

1 c buttermilk
1/2 c onion; chopped
1 tb paprika
1 ts tarragon, dried
1 1/2 ts garlic powder
1 ts celery powder
1/2 ts pepper
1 lb chicken parts


In a blender, combine all ingredients except chicken.  Mix well.  Place the chicken in a baking pan  and coat both sides with the seasoned buttermilk mixture.

Bake one hour, turning twice.  Serve immediately.

Notes:  Sugar Busters/Ellen Brennan


** Exported from Now You're Cooking! v5.86 **


I have sauteed small potatoes in butter until lightly browned.  Then add three tablespoons of Italian vinaigrette (Wishbone Brand works nice) directly to the saute pan and heat through.    Add directly to the mesculin lettuce mix and a nice plate is ready to be served.  

Thursday, August 26, 2010

Tenderloin en Croute


One of my "Elegant Company Favorites" is Pork Tenderloin en Croute, Tenderloin with a puff pastry crust.  This might sound very intimidating, but actually, this is so easy with a little preparation.  

The first thing is to prepare the Duxelles, (just the "fancy" name for Sauteed Mushrooms).  Sounds exotic..but so easy and so good.   These can be prepared a couple of days before hand and stored  in your refrigerator.   I use this recipe for chicken and it is outstanding with salmon fillets in the pastry crust.  

@@@@@ Now You're Cooking! Export Format

Duxelles

1/2 cup butter
2 tablespoon onion, minced
2  shallots, minced
1 pound mushrooms, minced
1/2 teaspoon salt
1/4 teaspoon white pepper
1/3 cup Madeira wine


Melt the butter in large skillet.  Add onions and shallots and cook briefly over medium high heat.  Add mushrooms and continue to saute, stirring frequently until all of the liquid that is released from the mushrooms has evaporated, about 20 minutes.  Once the mushrooms are darkened and dry, add the salt, pepper, and Madeira.  Continue to cook until the liquid has evaporated and the mixture is thick again, about five or six minutes more.   Adjust the seasonings.

Note:  For a quick and delectable hors d'oeuvre, spoon Duxelles into a bowl and surround with Melba Toast or other fine cracker.

Duxelles will keep refrigerated up to two weeks or frozen for three months.  Before using, reheat in micro to soften.


** Exported from Now You're Cooking! v5.86 **  


AND NOW ON TO THE PORK TENDERLOIN


Season a pork tenderloin, about 24 ounces, on all sides with salt  and pepper. Heat  a couple of tablespoons of  canola oil in a skillet large enough to hold the tenderloin, over medium-high heat. Add the tenderloin and reduce the heat to medium. Sear evenly on all sides and cook, turning frequently, until the meat reaches an internal temperature of 110 degrees F, 16 to 18 minutes. Remove from the pan and cool for about 10 minutes.

After cooling the tenderloin, I placed it on a sheet of Pepperidge Farms Puff Pastry available in the freezer section...usually near the frozen pie shells.   Let the sheet of pastry thaw on the counter for about an hour.   Handle with floured hands since the dough can become a little sticky.   Flour your board and rolling pin well and roll out to blend the fold seams in the pastry sheet.   You will have to do a little guessing at this point to be sure the pastry sheet it large enough to encase the entire loin. Generously top with the prepared Duxelles. 


Enclose the Duxelle covered pork loin with the pastry and seal edges with an egg wash.   Save your scraps and use for decorations.   I cut my scraps into little heart shapes...then finish the entire outside with egg wash which will make a beautiful glaze while baking.  


In a 400F preheated oven, bake for 10 minutes, then rotate pan to ensure even browning.  Bake until golden brown and an instant read thermometer reaches 140 degrees F, 10 to 12 minutes. Remove from the oven and let rest for 5 minutes before serving.

I have placed the pastry on a buttered piece of parchment paper.   It will be essential to have a non stick surface for easy removal from the baking sheet.   You don't want it sticking and destroy your efforts if you can't get it off the pan!!  


After the five minute resting period, the roast will be ready for slicing.   I featured this dinner with mashed sweet potatoes and sweet peas.   


To accompany this plate, I served a mesculin salad with glazed pecans and  dressed with a poppy seed dressing.   Seems to be just the right salad for this Elegant Entree!  


Bon Appetit!

Saturday, August 21, 2010

Apricot Glazed Pork Loin Chops

It was a good weekend shopping trip and Pork Loin Chops were on sale....my kind of meal, if I can get the good stuff on sale.  


One of my favorite sauces on pork is Madeira Apricot Glaze.   A good bottle of Madeira can be found at your wine shop and usually the price is around 15 and up for some of the more expensive varieties.  I stick with the reasonable priced bottles since I don't drink Madeira by itself...but always use it in cooking.    Poultry adapts nicely with a Madeira gravy.    The basic roux proportion with a cup of Madeira makes a very quick and flavorful sauce.   A couple of tablespoons adds great depth to a mushroom soup.  


My chops are in the brine for two hours and then to the grill.  It is a nice day so will be using the Weber Dome grill with indirect heat.  Really makes a perfect cooking environment for any type of roasted meat and/or poultry.  

Indirect Grilling in a Dome Weber

There are a few staples in the pantry including Smuckers Sugar Free Preserves.  The Raspberry and Blackberry flavors are great for pork and chicken.   I find the Apricot and Orange Marmalade flavor great also with ham and grilled fish.    I melt a half cup of the Apricot jam over low heat until melted.  Add a quarter cup of Madeira and stir to combine.   Baste on the loin chops during the last five minutes of the grilling period.   Also..I have discovered rather than standing over the grill,  I use a pair of tongs and dip the chops in the glaze, flip over...then return to the grill.  Saves basting and you don't end up with brush bristles embedded in the finished product. 

Apricot Glaze reducing by half


Beautiful Grilled Chop with a Wonderful Glaze


Bon Appetit!

Thursday, August 19, 2010

Lunch with Great Friends!

Such good news to reconnect with old friends.  
What a better way to get together than Lunch at my place!


To me, Summer just calls for Chicken Salad...and not just any Chicken Salad.   The only one that I make any longer is Ina Garten's Chicken Salad Veronique.  Ina  claims the "Veronique" part is green grapes.  This recipe is a sure winner every time.  


@@@@@ Now You're Cooking! Export Format

Chicken Salad Veronique

4 split chicken breasts, bone-in, skin-on; two whole
  good olive oil
  kosher salt  & pepper
1/2 cup good mayonnaise
1 1/2 tablespoons chopped fresh tarragon leaves
1 cup small-diced celery (2 stalks)
1 cup green grapes; halved


Preheat the oven to 350 degrees F.

Place the chicken breasts, skin side up, on a sheet pan and rub them with olive oil. Sprinkle generously with salt and pepper. Roast for 35 to 40 minutes, until the chicken is cooked through. Set aside until cool.

When the chicken is cool, remove the meat from the bones and discard the skin and bones. Cut the chicken into a 3/4-inch dice. Place the chicken in a bowl; add the mayonnaise, tarragon leaves, celery, grapes, 1 1/2 to 2 teaspoons salt, and 1 teaspoon pepper and toss well.

Notes:  Barefoot Contessa at Home © 2010

Yield: 4 servings

** Exported from Now You're Cooking! v5.86 **

Along with the wonderful salad, we will be having fresh cantaloupe with blueberries.  And the Pièce de résistance will be one of my favorite desserts, Orange Creme Brulee.  

@@@@@ Now You're Cooking! Export Format

Orange Creme Brulee

1 c heavy cream
1 tb orange zest
3 lg egg yolks
1/4 c superfine sugar
  pinch of  salt
1 ts orange extract; I prefer Penzeys
  For The Topping:
3 tb superfine sugar
  orange peel; for garnish


Preheat oven to 300F.

Measure cream into small saucepan.  Grate orange zest into cream.  Heat, stirring constantly but do not let boil.  Set aside.

In mixing bowl, mix the egg yolks sugar, salt and orange extract.  Begin adding the hot cream a couple of dribbles at a time to temper the eggs.  Don't pour all at once or you will scramble, i.e., cook the egg yolks.  After adding all the cream, strain the mixture through a fine sieve.

Pour the cream and yolk mixture into small four ounce  ramekins dividing evenly.    Place them into a hot water bath and bake for about 35 minutes, until the custard jiggles only slightly in the center.  Remove from oven and allow to cool in the water bath.  Cover each with wrap and refrigerate for at least on hour before serving.

To serve, sprinkle remaining sugar over each ramekin.  With brulee torch, caramelize the tops of each.  Return to refrigerator to cool for 20 minutes.  Garnish with orange peel.   

This is an excellent recipe to prepare in advance...and torching top with guests watching is an easy impressive event!

Notes:  ©WHStoneman 2010

Yield: 4 servings


** Exported from Now You're Cooking! v5.86 **


Tuesday, August 17, 2010

A Good Summer Salad

Chicken Tender Salad
These hot East Tennessee summer days are going to continue..I can just feel it!!   As my Grandma would say..."It's gonna be Ninety Two Damn Hot today".   

But having a good sale on tenders this week at $1.99 a pound, I just had to grab four packages at Food City.  They were running about one pound to a pound and a third....just right for two servings and a little left over.  

I began with dredging the tenders in flour, salt, cayenne pepper, garlic powder and Smokey Paprika.   Used about a cup of flour and the rest you can add to your taste.  I do find myself going a little more heavy on the salt and Lawry's Seasoning Salt adds a great zing.  


My trusty Lodge 10"  cast iron skillet is the best for frying anything....   just remember to keep your thermometer handy and keep the oil temp at 365F.   Don't crowd the pan...it will make the temp drop and you will end up with soggy chicken.   This is how I make anything "fried".  
 
 
Purchased mixed greens at the grocery, since it is so hot, I can't keep a single "salad green" growing.   And there is such a great variety from mesculin to baby spinach available at a very modest cost.  Added red onion, chopped  egg and English Cucumbers...with a topping of my Bleu Cheese Salad Dressing.    
 
Dig in And Bon Appetit 

Saturday, August 14, 2010

The Peaches are IN!


Wonderful Peaches are arriving from South Carolina...so good and so juicy this year.  

My first thought.....what will it be...deep dish peach pie, peach cobbler or peach crisp.   A little poll narrowed it down to Peach Crisp.   This is an old family recipe..you know the kind that was written in the back of a decades old cookbook.   I redid it for your convenience since you might not want to see the tattered and stained family cookbook.   

My original recipe calls for brown and white sugar.   I use Splenda and Splenda Brown Sugar just to keep the sugar lower.  I find that Stone Ground Whole Wheat flour works very nice too...a little more "nutty" of a flavor. 


For ease of peeling peaches, place a knife cut "X" on the bottom of the peach.   Add to boiling water bath for two to three minutes.  

 
IMMEDIATELY...place peaches in an ice water bath to stop the cooking process.   When cool enough to handle, the peach skins should slip right off.   If not, return to the boiling water bath for a thirty more seconds.   Slice peaches in prepared pan and proceed. 

@@@@@ Now You're Cooking! Export Format

Peach Crisp

8  peaches
1 cup flour, all purpose
1/2 cup brown sugar
1/2 cup sugar, granulated
1 teaspoon cinnamon
1/2 cup butter; cold, cut in pieces
1/2 cup rolled oats


Preheat oven to 350F.  Slice peeled peaches.

Place peaches in buttered 8" x 12" baking dish. Combine flour with brown sugar, white sugar and cinnamon. Cut in butter into it until it is in tiny bits and easiest to do in food processor.

Bake for 1 hour or until topping is crisp and peaches are tender. Serve on its own or with vanilla ice cream.

Yield: 6 servings

** Exported from Now You're Cooking! v5.86 **


Fresh from the oven to cool!
Ready for serving...with fresh whipped cream 


This Peach Creation looked too pretty cooling in the 
Sun on my counter...I just had to share it with you.

Here is a small addendum from today, August 27.  Peaches are  still coming in beautiful and I was compelled to buy more.   We did have Peach Crisp last  week, but I needed another "small" dessert for this weekend.   Prepared a pastry shell and added my peaches with a quarter cup Splenda, sprinkle of cinnamon, 1/2 teaspoon Lemon Extract and two large teaspoons of Arrowroot for the thickener.  I like Arrowroot,since it thickens and the liquid remains clear, unlike a cloudy effect when you use flour, etc.   Also, added a small crumble, ala dutch apple pie to the top and into the oven at 350F for 40-50 minutes.   Now this beautiful dessert is ready for its closeup!! 


Monday, August 9, 2010

Sunday, August 8, 2010

My Favorite Meal

...is still Breakfast.   And we enjoy that "meal" in the morning...and even for supper.   Unfortunately, many Americans skip this meal....which literally translates to "break" "fast"...to break from the fast.    A good breakfast will help with concentration, weight loss and a variety of other factors that affect our day's functions.  There really is nothing more distracting than being at work and being hungry.   That consumes your brain and your ability to do concentrate on any task.   

I  enjoy many types of breakfast and my usual weekday morning meal is Cheerios, Toast and Juice.  But the weekends allow for a little more time for preparation and this week's offering is one of my favorites....Poached Eggs with Lime Hollandaise Sauce on Rye Toast and my Cheese Grits.  

Starting with the grits, always begin with heating 2 cups of milk with a tablespoon of butter.  After the milk is hot, I add 1/3 cup of quick cooking stone ground white grits....NEVER use instant grits.  They just are not good.  

After  cooking the grits, I like to add scallions, browned bacon bits and cheese.  Then into the oven for 20 minutes at 375F.  to heat through and melt the cheese!


My version of hollandaise is LIME Hollandaise.   Instead of adding lemon juice, I use lime juice.   Blender Hollandaise is really the easiest thing to make.   Start with one stick real butter and melt over low heat.   Keep warm while preparing the blender with three egg yolks, a pinch of cayenne and a teaspoon or more of lime juice.  While the blender is running, SLOWLY add the hot butter...just a dribble at a time until it starts to thicken and becomes emulsified.   If making before hand, I use my wide mouth thermos bottle to keep warm.  

I have found that the little cheese product containers from the deli work great for poached eggs.  Break one egg into each container and this makes it so much easier to add the egg to the simmering water.   Don't forget to add a tablespoon of vinegar to the hot pan water...this will encourage the coagulation of the egg whites and keep them from spreading in the hot water.  Cover your pan and cook 3-5 minutes until you achieve your cooked preference....from a runny egg yolk or longer until completely hard.  


After cooking the eggs things start to happen quickly....have your toast or English Muffins ready.   Remove the grits from the oven and assemble! 

Ready to Enjoy with a frosty glass of Cranberry/Blueberry Juice!

Bon Appetit and have a great beginning 
to a Brand NEW DAY!!

Tuesday, August 3, 2010

Jerk!!


Just heard the radio...heat index in Memphis at 4PM is 119F.   Over here in the eastern part of Knoxville, Tennessee, it is just too damn hot!

But ....we still need to fix something for supper.   Got a great deal in boneless chicken thighs.   This has to be my favorite piece for any chicken dish.   Chicken breasts easily can turn out dry since they do not have enough fat to keep them moist and juicy.  

Over the years, I have found from Steve Ratchlin--Miami Spice how to create wonderful full flavored Caribbean cooking and BBQ.   The Jerk Brine here is something I have worked on with Steve's cookbook  guidance.    

In the Jerk Brine for three hours...then the GRILL!
Whenever I put chicken in brine, it always floats.   
I use this technique to solve the problem!!


@@@@@ Now You're Cooking! Export Format

Jerk Brine

1 qt water
3  garlic clove; minced
1 ts cinnamon
1 tb all spice
1 ts nutmeg
1 ts cloves
1 tb red pepper flakes
1/2 c kosher salt

Combine all ingredients and stir to dissolve salt. You can speed up the process by using a food processor or a blender. Usually, I will add all ingredients in the blender and add two cups water to mix. Then add balance of water in a bowl to cover meat. This is enough for 3 to 4 pounds of chicken or pork.

Notes:  WHStoneman

Yield: 1 quart


** Exported from Now You're Cooking! v5.86 **


Now to round out the meal, I serve the jerk BBQ chicken with my home made Mango  Chutney.   My friends from Miami got me hooked on mangoes a couple of years ago when they brought me four football sized mangoes from their garden paradise in Miami.  Now I have to resort to grocery mangoes about the size of small grapefruit, but they still are good.   Freshly shredded Cole slaw with crisp Granny Smith apples, fresh sliced garden tomatoes with a cool scoop of cottage cheese.  Sounds like a pretty good low carb supper.   
Bon Appetit!

Sunday, August 1, 2010

A Casual Night for Tacos

Too Hot...too humid for lots of cooking.   The perfect night for Make 'em yourself Tacos.  

Picked a couple of fresh tomatoes off our withering vines.   My plants looked very healthy at the beginning of July..but as of late, they are looking pitiful and my tomatoes are hard...not soft and ripe like last years' crop.  I don't know if it was the heat but we didn't have blossom end rot like in the past.  Heard a tip that Epsom salt is what the plants need...but oh well...next year will be better, I hope!

I found this copycat recipe ten years ago and since that time, I have never bought a "taco seasoning pak" that every grocery store sells.   This is just as good, easy to make and you probably have everything in your pantry right now to make this.  A teaspoon or more of chipolte powder adds a nice bit of smoky heat.  

@@@@@ Now You're Cooking! Export Format

Lawry's Taco Spices And Seasoning

8 tablespoon flour
2 2/3 tablespoons chili powder
2 2/3 tablespoons paprika
2 tablespoons salt
2 tablespoons minced onion
1 1/3 tablespoons cumin
2 teaspoon cayenne pepper
2 teaspoon garlic powder
2 teaspoon sugar
1 teaspoon pepper


Combine all ingredients in a small bowl.   Whisk to combine and stores well in dry container.  

To make seasoning sauce, add two tablespoons to 3/4 cup water to 1 pound browned ground meat. Bring to boil, cook 7-10 minutes, stirring occasionally.  

Makes filling for 12 tacos (about 3 Tbs) each.

Yield: 8 servings

** Exported from Now You're Cooking! v5.86 **
Ready for Serving 
Shredded Cheddar, Sour Cream, Tomatoes and Red Onion for serving 

When we have tacos, we make a salad with avocado and ranch dressing.  You can add your favorites including refritos to the taco.   Great eating on a hot evening.   

Cinnamon Rolls!!

Be damned with the diet...
some days just require hot out of the oven 
 CINNAMON ROLLS


This has to be my all time favorite sin...my mother's cinnamon rolls.   She really knew how to make us kids fat.   Bless her heart.   I recall growing up she always baked bread, rolls and hamburger buns.   My sisters and I always complained we wanted store bought hamburger buns...but in hindsight, I knew she was doing the right thing.  My mother, Doris learned bread baking from my Grandma Grace.  She knew bread!  

Ready for the Oven!


This is my mom's recipe...saved and reused over the years.  

@@@@@ Now You're Cooking! Export Format

Cinnamon Sticky Buns


1 ounce yeast
1/2 cup water; 105F.
1 tablespoon sugar
1/2 cup butter
3/4 cup milk; 105F.
1/2 cup sugar
1  egg
1 teaspoon salt
4 1/2 cup flour
      ----DOUGH FILLING----
1/2 cup butter
1 1/4 cup brown sugar
1/4 cup sugar
2 tablespoon cinnamon
      ----STICKY TOPPING----
1 cup brown sugar
3/4 cup butter
2 tablespoon dark corn syrup
1 cup walnuts or pecans; chopped 
[Mom preferred walnuts...I prefer pecans]

Dissolve yeast in 1/2 cup water and sugar. Proof 5 minutes.

Melt the 1/2 cup butter and combine with 3/4 cup milk. Mix dissolved yeast and butter/milk mixture on low w/ dough hook. Slowly add 1/2 cup sugar, then egg. Add salt and 2 cups flour on low. Blend until smooth. Slowly add balance of flour. Knead dough until is doesn't stick to hands.

Place in greased bowl, cover and let rise 45 minutes.

Prepare Sticky Bun topping: Melt Brown sugar, butter, corn syrup and cook over medium heat until sugar dissolves. Pour into pan and sprinkle with walnuts. Set aside to cool completely.

Remove dough from bowl and place on floured board. Roll out to 12 x 24 rectangle, not to thin. Spread 1/2 cup butter over dough. Sprinkle with dough topping ingredients. Roll dough into log. Cut into 1 1/2" widths.

Preheat oven to 425F. Place cinnamon rolls in pan on top of sticky mixture.  Cover and let rise until doubled.

Place rolls in oven and reduce temperature to 375F. Bake for 12 to 15 minutes or until golden brown. Remove from oven and let cool for 10 minutes. Invert on serving platter and cool to room temperature.

Notes: ©WHStoneman

Yield: 30 rolls

** Exported from Now You're Cooking! v5.86 **


Sticky goodness that rivals none!
Related Posts with Thumbnails

My Life and Times

My photo
Kingston, Tennessee, United States
The Fine Art of Cooking involves personal choice. Many preferences, ingredients, and procedures may not be consistent with what you know to be true. As with any recipe, you may find your personal intervention will be necessary -- © WHStoneman 2022